Update: As part of relaunching this blog in 2016, I am attempting to update and edit several of my old posts. My photography skills have only slightly improved. Unfortunately, I can’t go back in time and re-take the pictures. Bear with me, I’m a constant work in progress!
DIY Distressed Dresser

Every summer my family spends time on Lake Erie. My kid’s are the 7th generation to stay in my parent’s lake house in Linwood Park. Since I moved every few years while growing up, this is home to me even though we rented it out during most of the summer. However, a few years ago, my parents moved in year round and last summer I got started redoing my bedroom there.
A few weeks back, I shared my Driftwood Fish, he hangs on the wall in this room. I also took the old dresser that has been in my room for years and gave it a makeover. Many years ago my mom stripped the dresser with the intention of re-staining it…. yeah, that never happened…
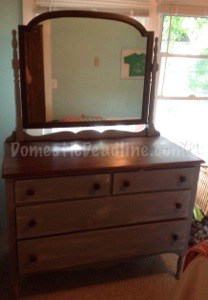
I took the mirror off before I took any pictures. Since I wasn’t blogging at the time, I didn’t do a full tutorial but I’d love to show you the before and after pictures.
Unfortunately, it looks like I only have the one before picture! Pretty distressed to begin with. It has great bones but didn’t have any pizazz… Easily fixed!
More Inspiration
I’ve looked at some awesome tutorials of how to refinish furniture, here are a few of my favorites:
- Domestically Speaking – gray cabinets
- DIY 180 – How to paint furniture
- Miss Mustard Seed – Difference between milk and chalk paint
- Just a Girl – How to paint furniture
I chose to dry brush a variety of shades of gray and then sand off some areas. My main color of choice was Benjamin Moore’s Hearthstone (#1601) in flat. Using leftover white and black acrylic craft paint, I mixed a few other shades. I had fun with it and just went for it. It’s only paint!
What I have found in painting and refinishing furniture is there is a lot of trial and error. I just go for it and have fun. One thing I always do when finishing furniture, new or old, is to coat it with Minwax Finishing Wax using a soft cloth to apply it and a clean soft cloth to buff it.
After
Here’s the finished piece! No, it doesn’t go in front of the window, but I got it in there and put it back together, then remembered to take the picture! It’s in a small room, so getting a picture of it in place is really hard, the bed is kinda in the way.
 Here’s a closer view:
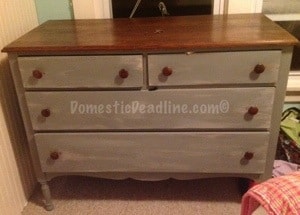
Tip: Try staining some of the wood it’s original color to add contrast to the piece. I waxed the top since it was in great shape and now it looks even better! Power of Paint has some great inspiration!
Have you ever finished furniture? Any tips to share?
Newer posts you may enjoy:
- I’m working on redoing my mudroom, giving it a farmhouse feel and great function. Check it out here.
- As a constant work in progress, I believe in editing. Blog Along with Me and see why
- Paint and tape can be used on canvas to give a theme to a whole bedroom, see O-Man’s Minecraft room.
I love painted furniture and that dresser looks so good! Great job! #Be.You.tiful link party
Thank you so much! I’m so happy with it
Wow, that turned out great! Thanks so much for sharing with the Let’s Get Real party this week.
Thank you!
Wow! It looks amazing! I LOVE painted furniture but I always get in over my head and it takes me forever to finish.
I have been known to do the same, but I needed to use this one so it kept me on track
Oh my, it does look totally different. That’s so cool, to be able to make something old look as if it’s brand new. I need to learn how to do that, we’ve got lots of old furniture and no possibility to replace it.
I have also saved money by using oops paints for old furniture that I couldn’t afford to replace
What a transformation! I don’t have the skill of seeing a piece and how it would looked transformed. I could do the project, I would just be headed into it blind.
Sometimes I have a vision, sometimes I just start painting and see what happens!
I really love the result – what a difference! Great color combination too!
Me too, thanks!
You Did A Great Job I Wish I Had Your Talent Sharp Looking Dresser!!
Thanks!
How cool that your family is the 7th generation to stay at the lake house! I love the distressing too 😉
It’s such a special place to all of us
That really turned out fantastic. I think the distressed look is nice.
Thank you!
Looks like new now. These furniture look sturdy. That saves money too as you did not have to hire someone to do the job and also no need to buy new one. Good job
Old furniture is made so much better than most new furniture.
I love projects like this!!! I do need to get some new dressers for my daughters. Instead of buying them brand new I should just get one from a thrift store and give it a makeover!
That’s what we did for my sister, I’ll be sharing that one in the future but she has all the pictures!
How fun! There are so many different things you can do.
Thanks!
Great job with the dresser! It’s so amazing that you have a place with such deep roots. It must be really special to visit during the summers!
It’s a wonderful place, hundreds of families love it there.
I’m very impressed! This is something that I always dream of doing (i even picked up a great chair that was sitting at the side of the road) but I never get around to it. That chair is still sitting in my basement….
I think when you know how to refinish your own furniture you save a lot of money. We had our table and chairs refinished and it costed us $1500.00. It was an antic and it has an emotional value to my hubby.
Thanks for the tutorials – I’ve been looking for some and clearly they work because I love waht you did with the furniture.
Your dresser looks great! I love that the top is different from the body. I have been looking to find a piece like this myself to redo, it’s out there somewhere 😉 Thanks so much for sharing this.
K.
Pingback: Dresser Makeover - Stripes and Music - Domestic Deadline : Domestic Deadline
Pingback: How to Clean Paint Brushes - Domestic Deadline : Domestic Deadline
Pingback: Bathroom Shelves - Using Space Wisley - Domestic Deadline : Domestic Deadline