Paper always seems to be a problem in our house. All three kids manage to bring paper into the house on a regular basis. Add in receipts, notes, and other paper I accumulate and the mail can set me over the edge! Our mail occasionally gets out of control, but I try to have the steps in place to tame it. I keep a recycling bin near the door and my DIY custom wall mounted mail sorter has made the process of dealing with the mail look that much prettier!
After months of looking for the perfect mail sorter, I gave up and decided to make one. I had every intention of using this tutorial to make exactly what I had in mind, and of course, time went by and I didn’t get to it.
So One Day
When I went to the office supply store to grab some things I needed I saw these:
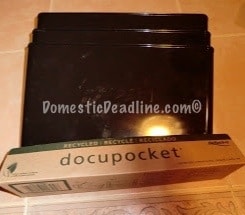
OK, pretty office-y and not what I really wanted but something caught my eye… Made in American from Recycled Materials!!!!! While I had not been planning on spending much money on this project (they were $10 each), I do go out of my way to purchase Made in America products or products that are environmentally friendly. Since this hit both of those categories, I decided to splurge (yes, I could have gotten a set of 3 for $10 but they were made in China from new materials… not good for the environment or the American economy).
Want to make yourself an awesome mail sorter?
Here is what you’ll need:
- 3 Wall pockets (either made, environmentally friendly/American Made like mine, or upcycled from ones you or someone else was going to discard is best….find a similar one here
)
- Bulletin Board
- Burlap and black fabric
- Elmer’s glue, foam brush and duct tape (don’t skimp on the cheap stuff here either, the original works so much better – and it’s made in America!)
- Staples and Staple Gun
- Hooks (I love these teal ones
)
- Large Frame (Mine was similar to this one
but I found it at the thrift store!)
First, cut out burlap large enough to wrap around your wall pockets. Spread some glue on the wall pockets and spread it out with the foam brush. Wrap the burlap around, smoothing it out over the glue.
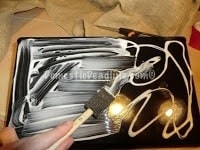
Using duct tape, hold all the edges of the burlap down on the inside of the wall pocket. Do all of your wall pockets and set them aside to dry. Yes, the black of the wall pockets shows through the burlap a bit, but I kinda like it that way.
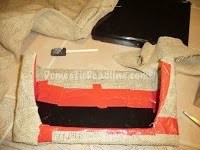
Next, cover your bulletin board with the black fabric. Staple the fabric in place.
Pockets
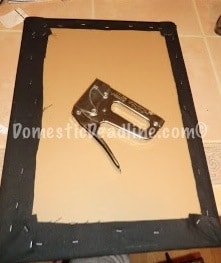
Now it is time to decide where to put your pockets. I decided to leave extra space between them instead of using the little attachment pieces that came with the pockets to connect them to each other. I kept them to one side to make room for the key hooks. Because it is a bulletin board, I could also use push pins and put important messages up! Once I knew where I wanted them, I used the screws that came with the wall pockets and screwed right through the duct tape, burlap, and black fabric into the cork board.

When I mounted it on the wall, JuneBug and I thought it didn’t quite look finished.

So we added a frame around it! The frame’s opening was an inch too wide, but I like how a bit of the wall color surrounds it. I used a few command strips to hold it in place.
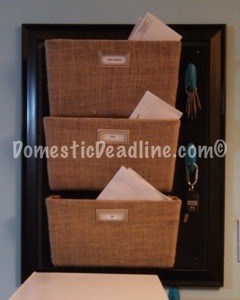
For my key hooks, I used Command Hooks, I love the color!
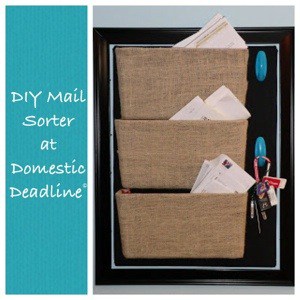
DIY Custom Wall Mounted Mail Sorter
Eventually, I added self-adhesive name plates so there was no question as to who’s pocket is who’s. The top one says “Needs Attention” and IronFish and I each have our own. Additional command hooks below hold wall baskets where I keep my sunglasses!
How do you control the paper monster in your home?
Other posts you might like:
- My quick mailbox makeover
- How to make a doorbell chimes cover
Nice job… I like the depth of the pockets- some of the mail sorter thingys would not fit in my back entry because of the depth and the door would hit it. Thanks for sharing
Thank you! I don’t have much space myself so this worked great for us! If you make one I would love to see it
Cute idea! We have a chalkboard thing I got at IKEA that has a spot at the bottom for mail. It definitely helps me keep the bills in a spot!
Thanks! Some days if the mail is sorted and that’s all I’ve accomplished, I’m happy!
This is totally what I needed!!! I have been dying for some kind of wall organization system for our kitchen/entry. We are drowning in mail, kids homework and misc. items. I love the key hooks too. Genius! Thanks for the tips!
Find me at:
http://www.freshandhappy.com
Laura Muir
Glad I could help!
Looks great! I might have to make one like yours for my home’s kitchen!
It is probably one of my favorite projects! I love function that is pretty too, good luck, I’d love to see yours
Great idea! Thanks for sharing at Share it Sunday. Fabulous! Look forward to seeing you link up again. Thanks for the support.
Thank you!
Pingback: DiY Kitchen Command Center : Domestic Deadline
Pingback: Custom Entryway Cubbies - DIY Mudroom - Domestic Deadline : Domestic Deadline
This is such a clever way to use wall pockets as mail organizers. It was fun to watch your project transform and the end result is awesome. #HomeMattersParty
Thank you, it really is helpful!
WOW! That looks really nice! I love that you placed key hooks on it as well. The burlap is of course “on trend” so your project is magnificently done! Thanks for sharing! #HOmeMattersParty
Jeannee
It’s so helpful!
What an amazing transformation! Love this mail sorter idea. Thanks for sharing at #HomeMattersParty 🙂
~Lorelai
Life With Lorelai
It sure helps!